Sourcing from Prismic
In this guide, you’ll set up a site with content management using Prismic.
Prismic is a hosted, proprietary Headless CMS (SaaS) with a web app for creating and publishing content. It’s suitable for marketers, editors, and developers as it has both a “Writing Room” and a fully-fledged API & content backend. Besides the usual advantages of a SaaS CMS (hosting, security, updates), Prismic offers features like custom type builder, scheduling and content versioning, and multi-language support.
Moreover, their Content Slices feature enables you to build dynamic layouts by defining reusable custom components and placing them on your landing page, case studies, or in your blog posts. Fortunately, you can use those in Gatsby to realize features like PrismJS highlighting or using gatsby-image. This starter shows you how to do just that!
In addition to written instructions, this guide also includes videos for more complex steps. You can find all of them in a YouTube playlist.
Note: This guide uses the Gatsby Hello World starter to provide a very basic understanding of how Prismic can work with your Gatsby site. If you’d like to start with a full blown template, check out gatsby-starter-prismic. If you’re not familiar with Prismic and its functionalities yet, check out Prismic’s official documentation which also includes user guides and tutorials. This guide assumes that you have basic knowledge of Prismic & Gatsby (See Gatsby’s official tutorial).
Setup
Prismic
Before initializing your Gatsby project you should sign up for an account on Prismic.io. The free plan is a perfect fit for personal or smaller projects. Create a new blank repository to get to the content overview of your repository.
Create your first custom type (Repeatable Type) with the name Post and add some fields to it. Choose rational names for the API ID input while configuring a field because these names will appear in your queries. You should always add the uid field in order to have a unique identifier (e.g. for filtering). Then switch to the content overview and create a new document with your Post type. Fill out the fields and publish the item.
In order for Gatsby to grab all information from Prismic you’ll need to generate an access token. Head over to Settings → API & Security, fill out the Application name field (the Callback URL can be left empty), and press Add this application.
Gatsby
First, open a new terminal window and run the following command to create a new site:
This will create a new directory called prismic-tutorial that contains the starters site, but you can change prismic-tutorial in the command above to whatever name you prefer!
Now move into the newly created directory and install the Gatsby plugin for Prismic:
In addition to installing the Prismic plugin, you also have to install the package dotenv to securely use your access tokens locally as you should never commit secret API keys to your repository!
Create a file called .env.development at the root of your project with the following content:
Note: If you want to locally build your project you’ll also have to create a .env.production file with the same content.
Now you need to configure the plugin (See all available options). The repositoryName is the name you have entered at the creation of the repository (you’ll also find it as the subdomain in the URL). The linkResolver function is used to process links in your content. Fields with rich text formatting or links to internal content use this function to generate the correct link URL. The document node, field key (i.e. API ID), and field value are provided to the function. This allows you to use different link resolver logic for each field if necessary.
Remember also to add an object of Prismic custom type JSON schemas. You can copy it from Prismic’s JSON editor tab in your custom type page. It’s important to keep the name of JSON file the same as your custom type’s API ID. More information can be found in the Prismic documentation and Source Plugin README.
Add the following to register the plugin:
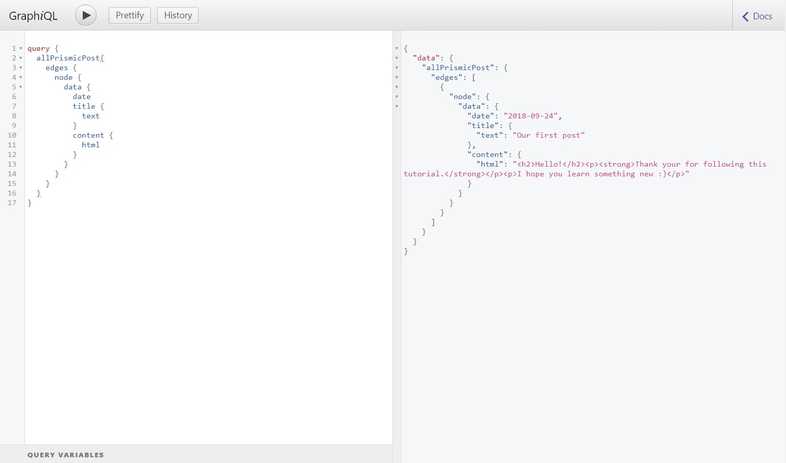
The best way to create your queries now is to first develop them in GraphiQL at http://localhost:8000/___graphql and then paste them into your files. Start the local development server and experiment a bit with the available queries. You should be able to get this query:
Because you defined the custom type as Post the query is called allPrismicPost (and prismicPost). You can also see the API IDs (from the field names) you created earlier.
With this information you can create pages/templates as usual:
Deploying to Netlify
Earlier you defined an API_KEY environment variable for the source plugin. Netlify can set build environment variables, too. Go to your site and enter the API_KEY variable under Settings → Build & deploy. This way the source plugin gets the access token passed on the build.
Netlify is able to automatically start builds on pushes to a repository and accepts webhooks to do so. Fortunately, Prismic can trigger webhook URLs when publishing content. With those features set up, new content will automatically appear on your Netlify site.
Setup your Netlify project and afterwards go to the Build hooks setting at Settings → Build & deploy. You’ll receive a URL of the format https://api.netlify.com/build_hooks/-randomstring- after clicking Add build hook. On your Prismic project, visit the Webhooks setting and insert the copied URL into the respective field. Confirm with Add this webhook. Every time you publish a new document, Netlify will re-build your site.
Adding more features
Categories
Prismic offers a Content Relationship field which is used to link to another document in your Prismic repository. You can use that in combination with a custom type to create a tagging system (in this example categories). And what’s cool about that? You can edit your entries any time and they’ll update in every post! Read the official docs on that or watch the video:
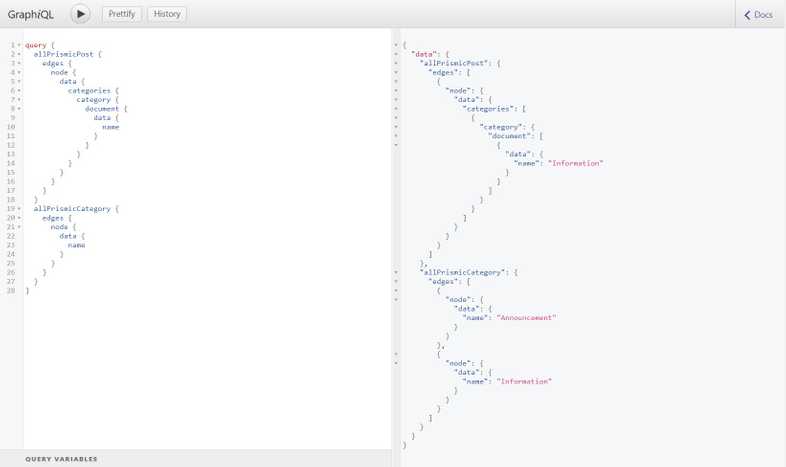
The video shows the usage of a group field and relationship field — if you only want to have one category, skip the group field. Similar as to the Post custom type the Category one can also be queried. Furthermore, the allPrismicPost query also has the categories node available:
Single Type
When creating a new custom type, you are able to choose Single Type, too. In this example, you’ll fill the homepage with content from Prismic and therefore have complete control over the content of your site. The goal is to eliminate the need to change website code, and to change your content in Prismic instead. Visit your Prismic repository and follow the video:
Single pages (like your homepage, privacy policy page etc.) don’t need GraphQL connections (e.g. allPrismicHomepage) due to the fact that only one document for that type exists in Prismic anyway. Therefore you need to use prismicHomepage for your query. This also has the benefit that you don’t have to map over an array. Your page could look something like this:
Wrapping up
This was an example meant to help you understand how Prismic works with Gatsby. With your newfound knowledge of Prismic (and perhaps even Gatsby), you’re now able to:
- Create a Prismic repository and setting it up together with the Gatsby plugin
- Query data from Prismic and using it to programmatically create blogpost pages
- Use Prismic together with Netlify
- Add relationships between posts, e.g. with categories
- Query data from Prismic for single pages
As mentioned in the beginning of this guide, if you got stuck, you can compare your code to the gatsby-starter-prismic which is the project set up in the videos. A working example created by following this guide is available in the commit history of the aforementioned starter. More advanced usages of Prismic in Gatsby would be Slices and Labels.

